This article describes how to add members to an Outlook distribution list. The instructions in this article apply to Outlook 2019, Outlook 2016, Outlook 2013, Outlook.com, and Microsoft Office 365 Outlook.
- How to Add Emails to an Outlook Distribution List
- How to Add Emails to an Outlook.com List
How to Add Emails to an Outlook Distribution List
To add members to an Outlook distribution list (also known as a contact group):
- Launch the Outlook desktop application and navigate to the Home tab, then to Address Book.
- Select the distribution list in the Address Book window.
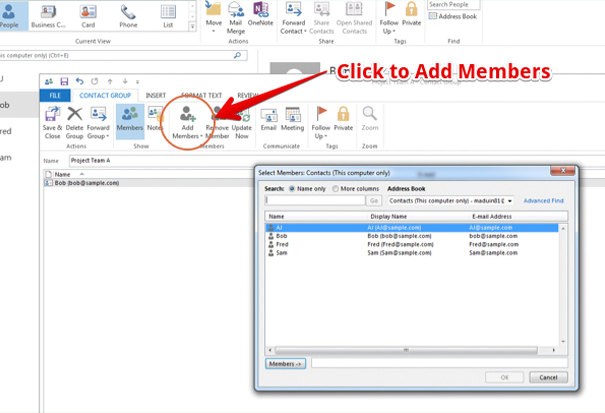
- In the Contact Group window, navigate to the Contact Group tab, select Add Members, and then select the contact’s storage location. Select From Outlook Contacts if the contact is already in your address book. Select New E-Mail Contact if the contact is not already in your address book.
- To add existing contacts from your Outlook Contacts list to the distribution list, select the contacts you wish to add (hold Ctrl to select multiple contacts), then select Members. To return to the distribution list, click OK.
- Enter a Display name and an email address to create a new contact. To return to the distribution list, click OK.
- Select Save & Close from the Contact Group window’s Contact Group tab.
The group’s contact information has been updated, and you can now send an email to the distribution list.
Additionally, Outlook allows you to create a distribution list using contact categories.
How to Add Emails to an Outlook.com List
When using Outlook.com, the process for adding members to a mailing list is slightly different:
- In Outlook.com’s lower-left corner, click the People icon.
- Navigate to the All Contacts tab and then to the contact you wish to add.
- Click Add to list, followed by the plus (+) sign beside the distribution list.