How to Send a Message in Mac OS X Mail from a Different Account

See the source image

This article describes how to configure Apple Mail to send messages from a specific email address. If you frequently use one address over the others, you can make it the default.

How to Send a Message from a Different Account in Apple Mail

By default, Apple Mail stores one email account. This is the address that is displayed automatically whenever you create a new email message. To modify the account or address associated with the Mail application in Mac OS X or macOS, follow these steps:

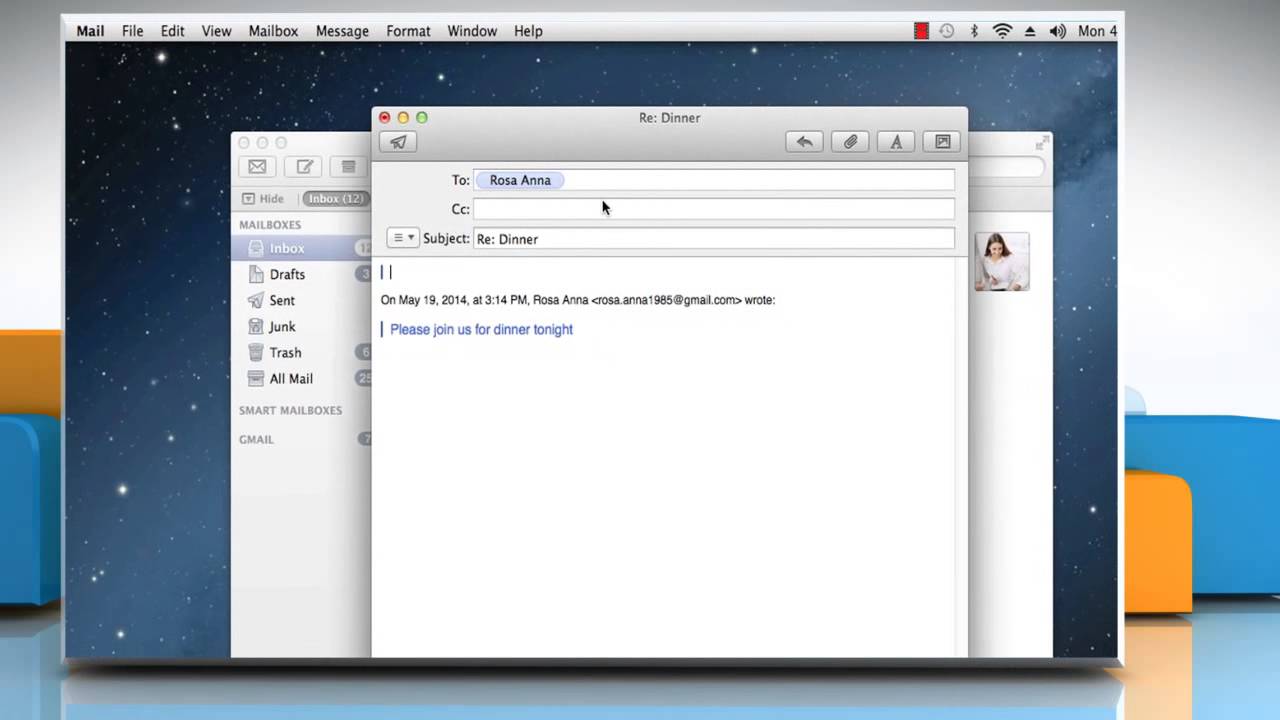
  1. Create a new message in Mail by selecting New Message from the File menu while the Mail app is open. Additionally, you can create a new message by clicking the New Message button in Mail or by pressing the Command+N keyboard shortcut.
  2. In the email’s Subject field, click on the From drop-down menu.
  3. From the list, select the desired email account.
  4. Continue to compose your email. When you click Send, the message will be sent from the email address you specified.

How to Modify the Default Email Address

If you discover that you frequently switch between accounts rather than using the default, set the most frequently used address as the default. To modify the default address used in the From field, follow these steps:

  1. From the Mail application’s menu bar, select Mail > Preferences.
  2. Navigate to the Composing tab.
  3. Next to Send new messages from, either type in the email address you want to use as the new default or choose Automatically select the best account.

When you select Automatically select the best account, the Mail application automatically selects the best account for the mailbox you’re currently using. For instance, if you reply to an email from your Gmail inbox, the Mac automatically fills in the From field with a Gmail address.

  1. When you create a new message, Mail populates the From field with the address you specified as the default.

How to Save Multiple Emails to a Single File in Mac OS X Mail

See the source image

In macOS 10.13 and later, this article describes how to save Apple Mail emails to a single text file.

Save Multiple Emails in a Single File

To save multiple messages from Mail to a single consolidated text file:

  1. Navigate to the folder that contains the messages you wish to save.
  2. Select the emails you wish to save to a single file by highlighting them.
  • While holding Shift, click a contiguous region.
  • While holding down Command, select multiple emails.
  • Additionally, you can combine these two methods.
  1. From the menu, choose File > Save As.
  2. Under Save As, type a file name that is different from the subject line of the first selected messages.
  3. Under Where, select a folder for saving.
  4. Under Format, choose either Rich Text Format (completely formatted email text) or Plain Text (plain text versions of email messages).
  5. Click Save.

The text file contains the sender, subject, and recipients of the messages as they appear in Mail when you read them.

How to Resend a Message in macOS Mail

See the source image

We will walk you through the process of resending a message in macOS Mail. The following information is applicable to Macs running macOS Catalina (10.15), macOS Mojave (10.14), macOS High Sierra (10.13), or macOS Sierra (10.12).

  • How to Resend a Message in macOS Mail
  • Additional Methods for Reusing Text in Email
  • Using macOS Mail to Resend Emails

How to Resend a Message in macOS Mail

To resend an email sent from Mac Mail:

  1. From the Sent folder in the Mail app, select the email you wish to resend.
  2. From the menu bar, select Message, and then from the drop-down menu, select Send Again to open the email in a new mail window.

Additionally, you can highlight an email in the list and either press Command+Shift+D or right-click and select Send Again from the resulting context menu.

  1. Make any necessary changes to the message or recipients, then click the Send Message icon to re-send it.

Additionally, you can resend emails from other folders or reuse any email you receive. Bear in mind that when you send a message from an email you received rather than sent, the message is sent from your email address, not the sender’s.

Additional Methods for Reusing Text in Email

You can copy and paste or create text snippets to reuse portions of a message. You can use the Text snippets located at Mail > Edit > Substitutions > Text Replacement to great — and productive — effect in emails you compose in macOS Mail.

Additionally, resending emails simplifies the process of designating and using them as message templates in macOS Mail: all that is required is saving them to a Templates folder.

Using macOS Mail to Resend Emails

With the Mail application included with macOS, you can quickly retrieve a sent email, edit the text or the recipient, and resend it in seconds.

There are numerous reasons why you may wish to resend an email:

  • You’re required to send a nearly identical message to another recipient with a minor modification.
  • You emailed it to an out-of-date address and now have the correct one.
  • An email was returned to you due to a delivery failure, and you wish to resend it.
  • You sent an email from the incorrect account, with the incorrect email address in the From header line, in order to unsubscribe from one of those annoying mailing lists hosted by a nitpicking list server.

Reusing an email you sent (or any email) is particularly simple in Apple’s macOS Mail application. You can resend previously sent messages or emails. You have the option of editing the text or changing the recipient before the email is sent.

Configure Outlook.com’s Incoming Mail Filter for Windows Live Hotmail

See the source image

This article describes how to configure an incoming filter in Outlook.com for Windows Live Hotmail. It also contains information on how to create a new rule from the inbox that automatically moves all email messages from a particular sender to a folder.

Configure Outlook.com’s Incoming Mail Filter for Windows Live Hotmail

In 2013, Microsoft rebranded Hotmail as Outlook.com. Individuals with Hotmail email addresses can continue to use Outlook.com to access their email.

Allow Outlook to automatically organize your incoming Windows Live Hotmail mail by moving it to a designated folder. Create a rule to automatically file incoming mail.

  1. Log in to Outlook.com using your Live or Hotmail email address.
  2. In the upper-right corner of the window, click the Settings gear icon and then click View All Outlook Settings at the bottom of the Settings pane.
  3. In the left pane, click Mail, followed by Rules.
  4. Click on Add New Rule.
  5. Give the new rule a name, such as the name of the folder where messages that meet the conditions should be filed.
  6. Select a condition, such as From or Includes in the Subject. Enter the condition’s details, such as the sender’s name or the word in the subject line that you want to filter messages based on. By selecting Add a condition, you can add additional conditions.
  7. Select Move to from the Add an action list and navigate to the folder where you want to store filtered messages.
  8. Check the box labeled “Stop processing additional rules.” Save your rule to create it and begin filtering email messages.

Automatically Filter Email from the Inbox

Alternatively, from the inbox, create a new rule that moves all email messages from a particular sender to a folder.

  1. Select Create rule from the context menu of a relevant email in your message list.
  2. Select the folder in which you want to save all messages from that sender.
  3. Select OK twice.

KMail Review: A Complimentary Email Program

See the source image

While KMail is somewhat feature-heavy, it provides an abundance of control for the email superuser. KMail is the KDE Desktop Environment’s email client. It is a solid email client for Linux that is reasonably easy to use, powerful, and versatile.

  • KMail: The Fundamentals
  • A little more information about KMail
  • Using KMail to Create Emails

KMail: The Fundamentals

As is the case with the rest of KDE, KMail combines robust features, useful tools, and an intuitive interface. It supports multiple POP and IMAP accounts, as well as mailboxes in mbox and maildir formats. Additionally, it enables the use of multiple identities when sending emails.

KMail includes robust and flexible internal mail filters, as well as server-side support for procmail filtering and Sieve scripts. The email component has the ability to filter mail on the server, preventing users from downloading large attachments or spam. You can search for messages using virtual folders that are created automatically when certain criteria are met. These criteria do not include message tags, which you can create and apply to individual messages or conversations at your discretion.

The majority of users appreciate KMail’s quick and powerful search feature. With the addition of expressions and virtual folders, email management has never been easier. Additionally, IMAP accounts allow for folder searches in addition to local searches.

KMail not only displays HTML emails, but also converts them to safe and simple text. The rendering is clean and secure. Additionally, it highlights quoted text and organizes messages by thread. Unwanted email can be bounced back to the sender, creating the appearance of a dead email address. Additionally, the calendar integration enables you to easily create to-do items such as reminders.

A little more information about KMail:

  • OpenPGP/GnuPG cryptography and TLS/SSL connections are supported. Supports external S/MIME plug-ins.
  • Automated archiving backs up entire folders to a compressed archiving file on a scheduled basis.
  • Imports email and address book data from a variety of email programs.
  • Compatibility with Linux, BSD, and Unix. It is dependent on KDE.

Using KMail to Create Emails

The message editor supports HTML formatting in addition to providing powerful plain text editing capabilities. You can customize the templates used to generate new messages and replies, as well as create additional quick response templates. You can use this configuration to alter how the first email in a thread is copied, for example.

Additionally, KMail enables you to create text shortcuts that automatically expand to longer, frequently used phrases. If you include images in emails, KMail can resize them to be compatible with the majority of email services and programs. If this is insufficient, messages can be edited using an external editor (such as vim or Emacs).

In conclusion, KMail is a worthy rival to Mozilla Thunderbird and web-based interfaces such as Gmail.

How to Create an Outlook Mail Folder

See the source image

This article discusses how to organize your email in Outlook 2019, 2016, 2013, and 2010, as well as Outlook.com, by creating and using folders, subfolders, and categories.

To create a new folder in Outlook, follow these steps:

  1. In Outlook Mail’s left navigation pane, select the Inbox folder.
  2. Right-click and choose “New Folder” from the context menu.
  3. In the box that appears, type a name for the folder.
  4. Enter.
  5. To create a subfolder, navigate to the folder in which you wish to create it and follow the instructions above.

Color-Code Messages Using Categories

To customize your Outlook category preferences, navigate to Home > Categorize > All Categories. You’ll be able to create, delete, and rename categories, as well as assign each category a shortcut key. Select a message in Outlook.com and then Categorize > Manage categories. The Categories dialog box allows you to create or delete categories and specify whether they should appear in the Favorites list.

To add a category color to an email, follow these steps:

  1. From the message list, open an email.
  2. In the Home tab’s Tags group, click Categorize.
  3. Select the category for the email. In the message list and the header of the opened email, a color indicator appears next to the email.

Alternatively:

  1. Right-click the email you wish to categorize in the message list.
  2. In the resulting menu, click Categorize.
  3. Select the category for the email. In the message list and the header of the opened email, a color indicator appears next to the message.

Is it possible for an email message to fall into more than one category? Multiple color codes can be applied to an email message.

Create a New Folder in Outlook.com

To create a new folder, follow these steps:

  1. Click on New folder. At the bottom of your folder list, you’ll find the New folder link. At the end of the folders list, a blank text box appears.
  2. Give the folder a name.
  3. Hit Enter.

In Outlook.com, create a subfolder.

To add a new folder as a subfolder to an existing Outlook.com folder, follow these steps:

  1. Right-click the folder beneath which the new subfolder is to be created. Bear in mind that you should select items from the Folders list, not the Favorites list.
  2. From the context menu that appears, select Create new subfolder. Below the folder on which you right-clicked, a text box appears.
  3. Give the new folder a name.
  4. Enter the subfolder’s name to save it.

The same procedure applies for creating deeper subfolders beneath any newly created subfolders. Simply repeat these four steps for each new subfolder. Additionally, you can drag a folder from the list and drop it on top of another folder to create a subfolder.

Utilization of Folders and Categories

Individual messages from your Inbox or any other folder can be dragged and dropped into the new folders you create to organize your email. You can right-click a message, select Move, and then select a folder to which you want to move the email.

Also, you can create rules in Outlook to automatically route emails from specific senders to a folder or apply a category, eliminating the need to do so manually.

How to Import Emails From Windows Mail or Outlook Into Gmail

See the source image

Do you know the process of importing emails into Gmail from another email service using Windows Mail or Outlook for Windows 10? This article will walk you through the process.

  • Import Windows 10 Mail into Gmail
  • Import Outlook for Windows 10 Mail into Gmail
  • How Does This Function?

Import Windows 10 Mail into Gmail

To transfer messages between Windows Mail accounts, follow these steps:

  1. Log into the email account from which you want to migrate your emails to Gmail.
  2. Make a selection of the messages you wish to copy to Gmail.

While making your selection, hold down the Shift key to select multiple messages simultaneously. To select all emails in a folder, use the keyboard shortcut Ctrl + A.

  1. While holding down the Ctrl key, click and drag the highlighted messages to the left pane’s Gmail account to reveal a list of folders. Drop the messages into your preferred Gmail folder.

If you do not hold down Ctrl, the emails will be copied rather than moved to Gmail.

  1. Another method of copying emails into Gmail is to right-click the highlighted message and choose Move, followed by a folder from your Gmail account.

If you’ve imported all of your messages into Gmail as unread, you can quickly mark them as read to avoid clogging up your Gmail account.

Import Outlook for Windows 10 Mail into Gmail

In Outlook, the process of transferring messages between accounts is identical, but the interface is slightly different:

  1. Log into the email account from which you want to migrate your emails to Gmail.
  2. Make a selection of the messages you wish to copy to Gmail.

While making your selection, hold down the Shift key to select multiple messages simultaneously. To select all emails in a folder, use the keyboard shortcut Ctrl + A.

  1. While holding down the Ctrl key, click-and-drag the highlighted messages into a folder in the left pane under your Gmail account.

If you do not hold down Ctrl, the emails will be copied rather than moved to Gmail.

  1. Another method for copying emails into Gmail is to right-click on the highlighted message and choose Move > Copy to Folder, then select a folder from your Gmail account.

How Does This Function?

To migrate emails from other accounts to Gmail, you must first configure both accounts in your preferred email client (e.g., Windows Mail or Outlook). When configuring that account, be sure to use the Gmail IMAP settings. Additionally, you may want to create a new folder in Gmail for your imported messages.

As long as your Gmail account is configured to communicate with the Gmail IMAP server, any changes you make to Gmail on your computer will be reflected online. As a result, any emails copied to Gmail from other accounts will be uploaded to your Gmail online account. When you access your Gmail messages via the Gmail mobile app or website in the future, you’ll see the same messages that were previously stored exclusively in Outlook or Windows Mail.

Though not as seamless, another option is to use Thunderbird. To accomplish this, you must first import your messages from Outlook or Windows Mail into Thunderbird and then copy them into Gmail from Thunderbird.

Apart from manually copying all new messages into Gmail as they arrive, you can also configure your email client to automatically forward messages to Gmail or configure Gmail to check for mail from your other account (s).

How to Block a Sender in Outlook Mail Based on Their Email Address

See the source image

This article demonstrates how to configure Outlook.com to block messages from a specific email address or domain.

Outlook.com: Blocking Senders by Email Address

There are a few different methods for blocking spam senders in Outlook.com. The first method is via email that is delivered to your inbox folder. To create a rule in Outlook Mail on the web that deletes all messages from a particular sender and all current messages from that sender, follow these steps:

  1. On the left, click the Inbox option to view your emails. Double-click an email to open a message from the sender you wish to block.

Alternatively, if the Reading Pane is enabled, select the email to display its contents to the right of the screen.

  1. In the top-right corner of the Outlook Mail toolbar, click Sweep.
  2. In the For email from dialog box, you will be presented with four distinct options for email sweeping. To block and move all messages from the Inbox folder and any future messages, select Move all messages from the Inbox folder and any future messages.
  3. Click the drop-down arrow next to Move to and then click Deleted Items.
  4. To conclude, click OK.
  5. Outlook.com moves all messages in the current folder from the specified address to the Deleted Items folder and adds the sender to your list of blocked senders.

Using Your Junk Email Folder to Block Senders

If you receive email in your Junk Email folder, this does not always mean that the sender has been blocked automatically. You may also need to configure blocking for these senders. The procedure is slightly different but straightforward.

  1. If the Reading Pane is enabled, select an email from your Junk Email folder.

Alternatively, you can double-click the email to open it.

  1. At the top of the Outlook Mail toolbar, click the Not junk dropdown and then click Block.

Select Block at the top of the email if you opened it.

  1. Click OK to confirm that the sender’s emails will be blocked.

What Happens to Blocked Sender Messages?

Messages sent by senders on your blocked senders list are automatically deleted. Both you and the sender are unaware, and the messages disappear from your Deleted Items or Junk Email folders.

In Outlook on the Web, you can block domains.

To transfer messages from a domain to the Deleted Items folder, follow these steps:

  1. Click on Settings.
  2. Click View all Outlook preferences.
  3. Navigate to Mail > Junk email.
  4. Select Add in the Blocked senders and domains section. After that, enter the domain name you wish to block.
  5. Enter to add the domain to the list of blocked senders.
  6. Click Save, and then click OK to close the Settings dialog box.

Prevent Spam by Blocking Senders and Domains

Blocking specific senders or domains may not be effective at preventing spam, as spam rarely originates from the same address twice. Report spam emails that arrive in your Outlook.com Inbox to help combat spam. This procedure trains spam filters to recognize and filter future messages with similar content. Additionally, you should report phishing scams.

How to Add Strikethrough Text in macOS Mail

See the source image

This article describes how to use the formatting bar in macOS Mail to add strikethrough text. This information is applicable to macOS Sierra (11) and macOS Big Sur (10.12).

Create Text Strikethrough on a Mac

In macOS Mail, you can add a text strikethrough to an email you send, forward, or reply to by selecting the text and then clicking the strikethrough formatting button. Strikethrough indicates to the recipient(s) that you have changed your mind about the content or that the information is no longer valid.

The strikethrough button is located above the main body of new emails and email replies in the Mail formatting bar. You can use the strikethrough button in the format bar to delete individual words, letters, or entire paragraphs.

  1. In the macOS Mail application, create a new email screen or a forward or reply-to screen. If the formatting bar is not already visible, click the A button in the top right corner of the message window. The formatting bar is centered above the message and contains controls for font, size, text color, and alignment, among other things.
  2. Verify that you’re in rich text mode by selecting Format in the Mail menu bar and then selecting Make Rich Text from the drop-down menu if it hasn’t been selected already. If the menu option Make Plain Text appears, the message is already in rich text mode. No additional action is required.
  3. In the email’s body, highlight the text you want to strike through.
  4. To strike through the highlighted text, click the S button (next to B, I, and U in the formatting bar).

That is all that is required. You can undo the strikethrough by clicking the same S button, or you can select additional words or letters to strikethrough in the same message.

Tip: If you strikethrough a word at the end of a sentence and then continue typing, the strikethrough may continue to your new text. To avoid this, toggle the S button off after using it to ensure that any new text is set without the strikethrough.

How to Add an Email Address to the Contacts List in Gmail

See the source image

In this article, we will walk you through the process of adding an email address to your Gmail contacts and then editing the contact to add additional information, such as their name. The instructions below apply to Gmail when accessed via a browser on a desktop computer.

How to Add an Email Address to the Contacts List in Gmail

Apart from making a new contact’s information accessible on other devices, another reason to add them to Gmail is to ensure they are recognized by Google and not routed to spam. This article will demonstrate how to add an email address to your Gmail contacts.

  1. In Gmail, open a message from the sender you wish to save as a contact.
  2. Hover your cursor over the email’s sender’s name at the top.
  3. On the pop-up pane, click Add to Contacts.
  4. Select Edit Contact to add additional information about this contact. Enter the sender’s name and any additional information you may have about the individual. You are not required to complete all fields. You can always edit your entry later.
  5. Once you’ve entered all of the necessary information, save the new contact.

When you type a letter or two into the To field while composing a new email, Gmail automatically fills the field with addresses that match, saving you from having to manually look up addresses in your Contacts list. However, if you haven’t saved the address, Gmail will be unable to do so.

In Gmail, navigate to the Contacts tab

When you’re ready to expand or edit the contact information you currently have:

  1. To begin, open Google Contacts.
  2. In the search field, begin typing the contact’s name or email address. Gmail will suggest contacts that are a match. If Gmail does not suggest the appropriate contact, select it from the search results.
  3. The contact’s information is displayed. To edit a contact, click the pencil icon.
  4. Make the necessary modifications or additions. At the bottom of the contact screen, click Show more to reveal additional fields.
  5. Click Save.

Concerning Google Contacts

When you add a sender to Google Contacts, the information is synced across all of your computers and mobile devices, ensuring that it is accessible regardless of where you are or which device you use.

Take Control of Your Gmail Account With These Tips, Tricks, and Tutorials

Once you’ve accumulated a collection of entries, you can organize, review, and merge them. Additionally, you can create personal mailing lists in order to send messages to groups without having to enter each member’s email address individually. You can always create new Gmail groups.